In this course of Linux commands, we will introduce four Linux Command – (apt-get)(Shutdown)(tree)(which-where):
apt-get
Shutdown
tree
which-where
(apt-get):
The apt-get update command updates the list of available packages (programs) that can be downloaded.
*If you type this command as a non-root user, the system will refuse to execute the command because the user does not have the necessary privileges.
• The shutdown command allows you to schedule device shutdowns and restarts, sends a warning message, and prevents other users from connecting.
• To use this command, you must have root rights: if you are not logged in as superuser, use Sudo.
To quickly turn off the computer
> Shutting down -h now
• To restart the computer immediately
> Shutdown -r now
• To shut down the system in 30 minutes and notify other users of the action
> shutdown -h -t 30 “Scheduled shut down for maintenance”
(tree):
Sometimes it is useful to have an overview of the tree structure of the file system to facilitate navigation between files. We can use the command tree. This command does not install by default. To install it:
> sudo apt-get install tree
> tree
To display only directories without the list of filenames:
In this course of Linux commands, we will introduce the command (which-where). We start tutorial by mentioning the structure and example.
In general, executable programs are in one of the following directories: /bin, /usr/bin, /sbin, /usr/sbin, /opt
To locate an application, we use command “which” or “where”
In this course of Linux commands, we will introduce How to Create Users in Linux (useradd Command). We start tutorial by mentioning the structure and example. In Linux, the adduser command is for creating a user. There are several commands and methods to create a user in Linux, such as useradd, adduser. One of the features of the Linux operating system is multi-user support.
It is possible to create different users and separate groups by specifying the access level for each user or group in Linux. The two commands adduser and useradd work similarly and both commands have the same behavior.
adduser–system [options] [–home DIR] [–shell SHELL] [–no-create-home] [–uid ID] [–group | –ingroup GROUP | –gid ID][–disabled-password] [–disabled-login] [–gecos GECOS] user
when we try to create user, we have these questions:
Username: The username or login name should be between 1 to 32 characters.
Password: password save in /etc/shadow file in an encrypted format
User ID (UID): The user id is 1004. (“0” is for root user)
Group ID (GID): The group id is “1004” and save in directory “/etc/group”
User Info: information like Full name, Room Number, Work Phone, Home phone, Other
Home Directory: path is “/home/username”
Shell: user is “/bin/bash”
The Sudo utility allows users to run programs while using the security privileges of another user, usually root (superuser). The function of Sudo is like “run as” in Windows system.
Steps to set up and run Sudo (to run all commands as administrator). If the system is not already configured and enabled to use Sudo, changes must be made so that a non-root user can manage the system.
• In the command line, enter the command :
> su
You will be prompted for the root password.
Create username:
> adduser <user_name> sudo
> Sudo adduser user1
You can find other learning for Linux by clicking here.
It is an intrusion method that hackers use to find open entrances or network weaknesses. Through this attack, they find open ports in the system and can send or receive information. They can make sure that firewalls are active or inactive by cyber-attack on ports scanning.
They send a packet to a port and in the message that they receive, they can determine whether the port is active or inactive and whether there is a weak point to enter the system or not. Network administrators inform about the vulnerability of the network system in companies and organizations by scanning the ports and take action to secure those ports.
we can use Applications like (Nmap) and Netcat check the security of the network. During port scanning, we can get information about running services, users, unknown intrusions and much more.
With port scanning we can find which ports are open on the network and they can receive or send data. We can also send a special packet to a certain port to identify the vulnerability of that port. Its purpose is to identify IP addresses, hosts, and ports.
After a full network scan, we can enable unauthorized access. IT managers use this process to investigate vulnerabilities and by cybercriminals for sabotage. The scan results can determine the network security levels.
All ports assigned by port numbers, and they range from zero through to 65,536 and ranked in terms of popularity. Ports numbered 0 to 1,023 are called “well-known”, these ports assigned by the IANA. IANA is an Internet Assigned Numbers Authority.
In this part, we try it with Kali Linux:
for this learning we have three virtual machines, and we test with them: Debian, CentOS, Windows
In this tutorial we want to try Firewall in CentOS but before that we ask: What is a firewall? Firewalls are the first line of defense in network security. They are a network security device that can be hardware or software and control incoming and outgoing traffic.
Firewall is a part of network security that controls and filters traffic. The firewall place between the Internet and the end user and filters the Internet based on the rules previously defined for it and whether it allows access or not.
In Linux, Netfilter use to allow access or deny access to network traffic. Filtering packages and their management is particularly useful and important for management in an organization.
If a package enters the server, we need Netfilter to check it so that we can check it according to the rules and allow access or not.
A firewall is a set of rules, and when a packet tries to pass through it, its contents are checked according to the rules of the firewall. A firewall is a tool for managing firewall rules on any Linux machine and it can also be described as a device that examines network traffic (outgoing/incoming connections) and makes traffic decisions.
Now we try to install it in CentOS:
In during this tutorial, we try to Start, Stop, Enable or Disable
First, we check status by command systemctl
If it was inactive in setting let to start it, after starting it, we can check again status.
there are four options to check firewalld that we can use:
[start/stop/disable/enable]
this command is for checking status:
$systemctl status firewalld.service
firewalldis a dynamic firewall that provides support at the trust level of connections or network interfaces and supports IPv4, IPv6 protocols.
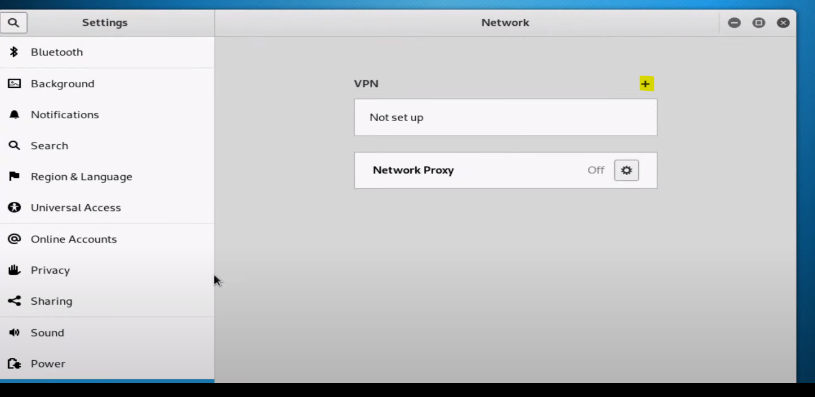
Sometimes when we install Kali Linux, we have Interface problem and we don’t have any interface in the network settings at first, in this tutorial we will teach you, how we can add an interface and make the corresponding settings.
We check some setting in Kali Linux:
First, we can check settings and if we can add interface, we do it by graphic mode. If the option to add was off and we cannot add it, then we try by command.
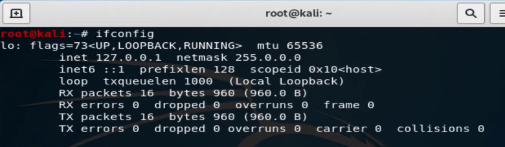
To check setting by command we type ifconfig. If any interface was on, you can have in result
note: Inet 127.0.0.1 netmask 255.0.0.0 is not active interface
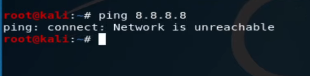
You cannot see any interface and IP; we go next steps. also, we can check it with ping 8.8.8.8
Command DHClient:
The DHCP protocol requests an available IP address from a server or IP provider, which may be assigned in one or more subnets. A DHCP client may request an address from this pool and then use it temporarily on the network. Also, when requesting an IP address, a client can get more details about the connected network, such as the range IP, Gateway, name server, etc.
When running the dhclient command, the dhclient.conf file is called for configuration. It then gets a complete list of network settings configured on the current system and attempts to configure the interface using the DHCP protocol.
The DHCP Client or dhclient command is a tool for configuring a network interface using the Dynamic Host Configuration Protocol
with command #man dhclientyou can get more information about this command in Linux: