برای ایجاد کاربر در مایکروسافت 365 از مرکز مدیریت مایکروسافت 365 استفاده میکنیم که یک پورتال مبتنی بر وب است. ما از این پورتال برای مدیریت حساب ها و پیکربندی سرویس ها استفاده میکنیم
Intune، SharePoint، Teams، Exchange، OneDrive
در این قسمت می خواهیم کاربر را در مایکروسافت 365 با پورتال ایجاد کنیم
بخش کاربران: ایجاد، حذف، مدیریت کاربران، تنظیم مجوزها، ویرایش جزئیات کاربر و بازنشانی رمزهای عبور
بخش گروه ها: ایجاد، سازماندهی، مدیریت و حذف گروه ها
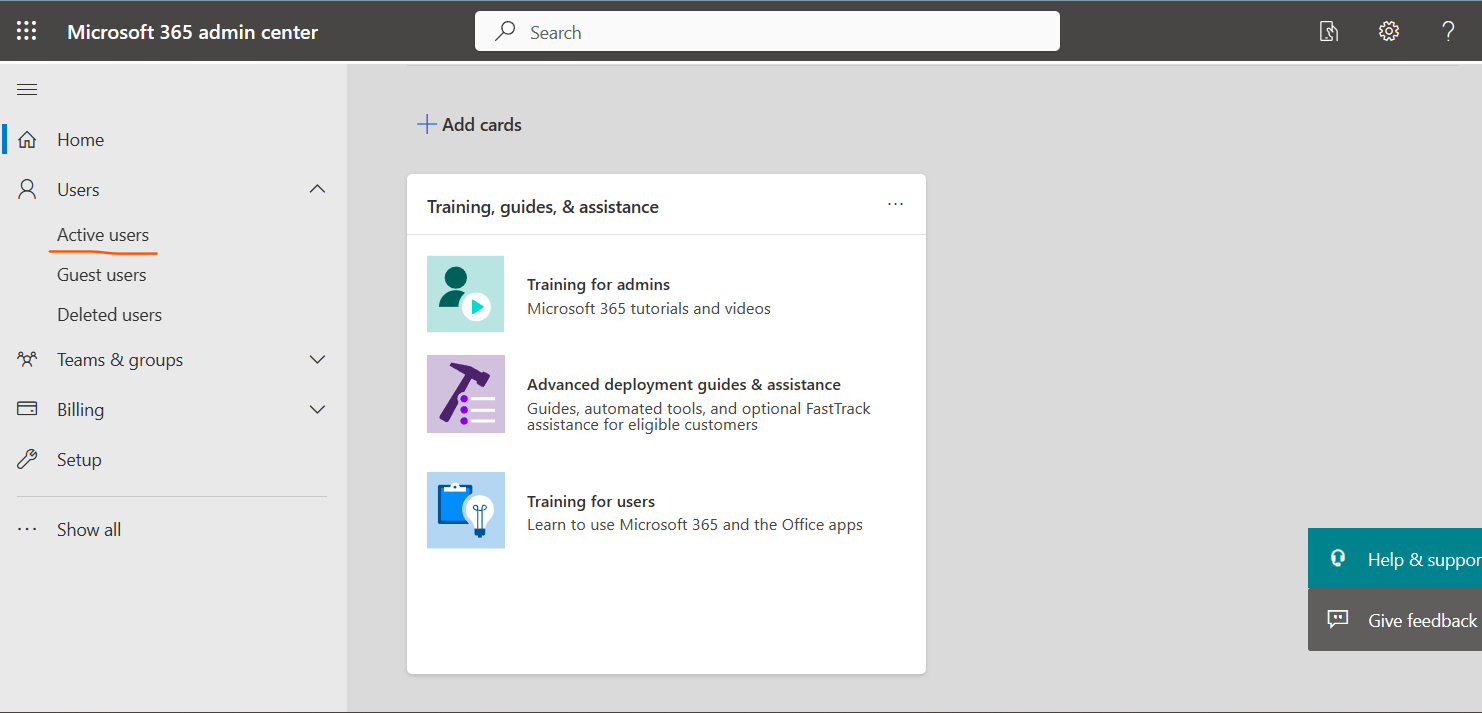
با نقش ادمین می توانیم وارد شوید و کاربر را ایجاد کنیم. برای شروع به این لینک وارد می شویم
https://admin.microsoft.com/
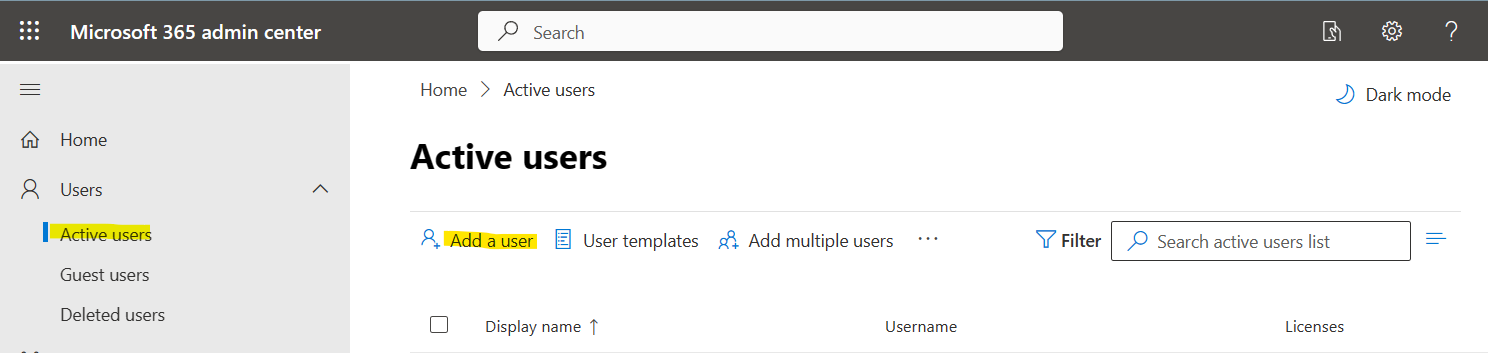
:در منو روی کاربرهای فعال کلیک می کنیم
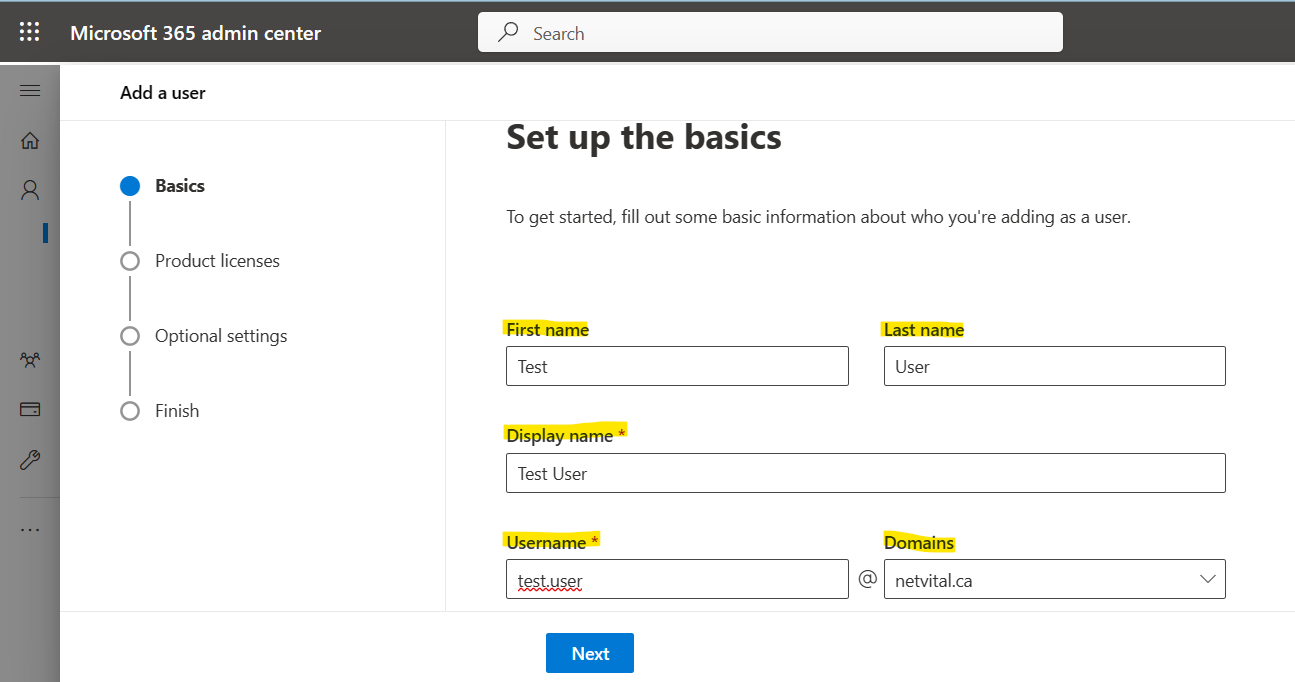
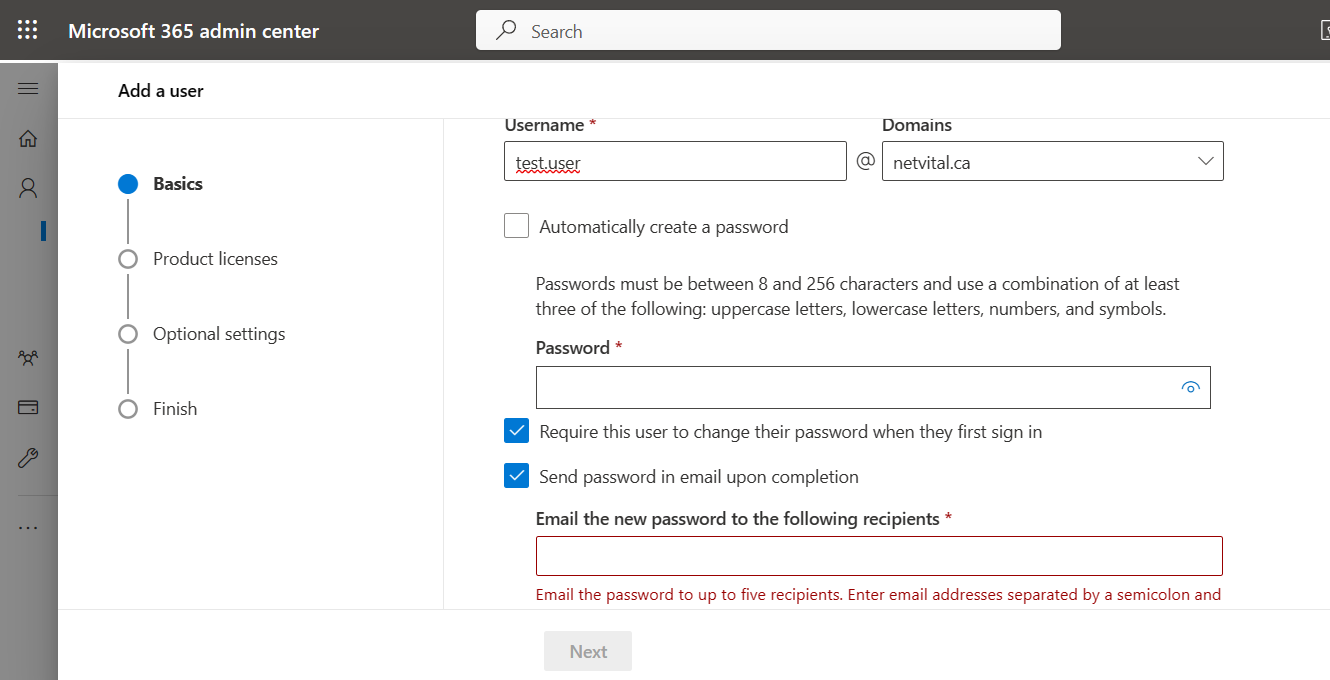
در این قسمت به نام – نام خانوادگی – نام نمایشی و نام کاربری نیاز داریم
نام کاربری باید منحصر به فرد باشد و اگر از قبل همان نام کاربری را داشته ایم، با خطا مواجه می شویم، آخرین بخش هم نام دامین است، اگر چندین دامنه داشته باشیم، در این قسمت میتوانیم هر کدام را که میخواهیم کاربر با آن بسازیم انتخاب کنیم
:در انتهای صفحه سه گزینه داریم
اول: می توانیم رمز عبور را همانطور که می خواهیم ایجاد کنیم یا به صورت خودکار ایجاد کنیم دوم: اگر بخواهیم کاربر در اولین ورود رمز عبور را تغییر دهد، می توانیم این گزینه را انتخاب کنیم سوم: و اگر بخواهیم رمز عبور را از طریق ایمیل ارسال کنیم، می توانیم آخرین گزینه را انتخاب کنیم
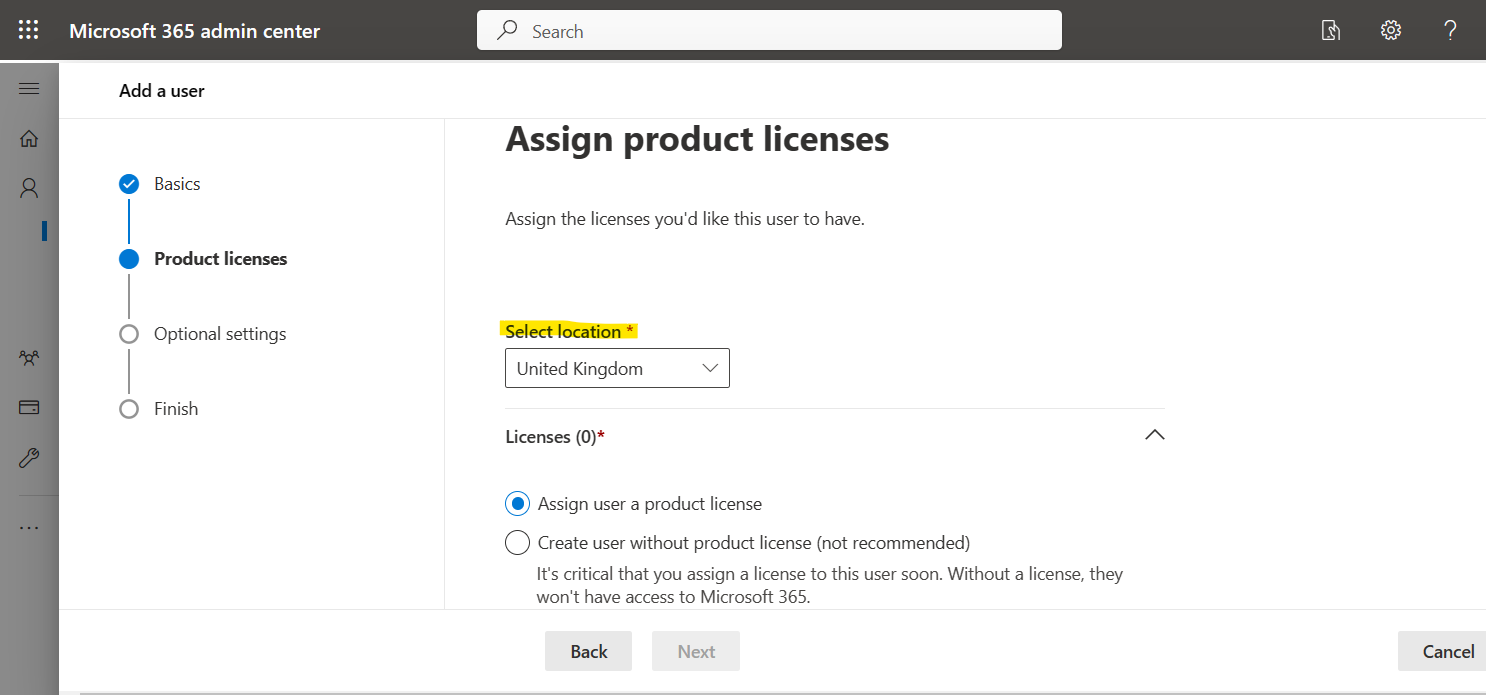
:در صفحه بعد، می توانیم کشور را انتخاب کرده و لایسنس اختصاص دهیم
مایکروسافت مجوزهای زیادی برای کاربردهای مختلف دارد که میتوانیم خریداری کنیم
در این قسمت می توانیم لایسنس ها را با هم مقایسه کنیم و بهترین محصول مورد نیاز خود را بخریم. همانطور که میدانیم برای خرید حتما باید با کارت اعتباری خریداری شود، ما میتوانیم شما را در این راه راهنمایی نماییم
:صفحه بعدی اختیاری است
اگر کاربری که ایجاد میکنید، میخواهید نقشی مانند ادمین اختصاص دهید، میتوانید در اینجا اختصاص دهید، یا میتوانید پس از آن نیز این کار را انجام دهید، در غیر این صورت میتوانید از این قسمت عبور کنید
:چند نمونه از نقش ها اینجا وجود دارد
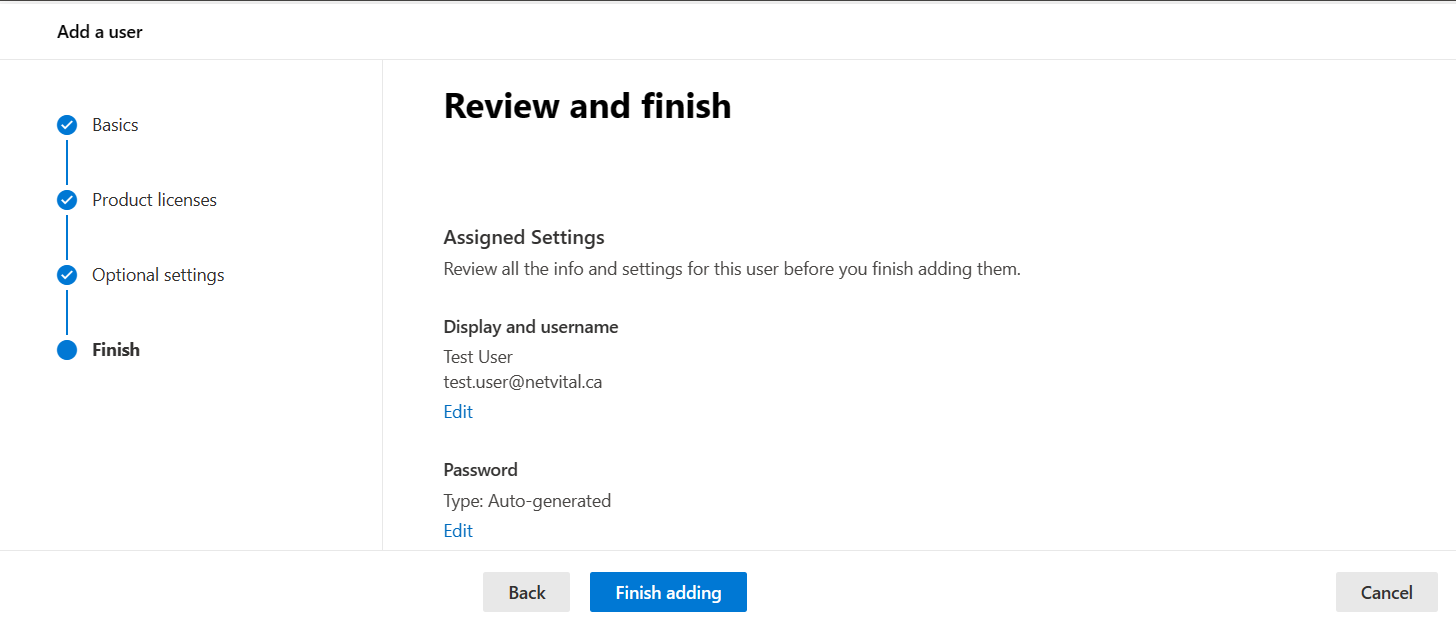
:و صفحه آخر بررسی و پایان است
:در این صفحه، می توانید تمام اطلاعات را بررسی کنید و اگر درست بود، می توانید آن را تایید کنید
.می توانید فیلم مربوطه را از کانال یوتوب ما تماشا کنید
در این بخش به مبحث ذخیره و بازیابی می پردازیم ولی قبل از آن می بینیم که ذخیره و بازیابی چیست؟ ذخیرهاطلاعات به پشتیبان گیری از داده ها در حافظه خارجی برای محافظت از آنها در برابر حوادث و از دست رفتن اشاره دارد. بازیابیبه بازگرداندن داده ها از یک نسخه ذخیره شده به محل اصلی یا به مکان دیگری که اطلاعات از بین رفته یا آسیب دیده است، اشاره دارد
برای ذخیره اطلاعات، از یک سیستم یا رسانه جداگانه مانند هارد درایوهای مجازی، سرورهای ذخیره اطلاعات یا فضای ذخیره سازی ابری استفاده می کنیم تا از آنها در برابر احتمال آسیب به داده ها محافظت کنیم
چرا به پشتیبان نیاز داریم؟
با تهیه نسخه پشتیبان، از اطلاعات موجود در حافظه جانبی کپی می گیریم تا در صورت آسیب دیدن داده های اولیه بتوانیم آن را بازیابی کنیم.
:خرابی داده های اولیه معمولاً به دلایل زیر رخ می دهد
نقص سخت افزاری
نقص در نرم افزار
فساد اطلاعات
خطای انسانی – حذف تصادفی داده ها
حمله ویروس ها یا بد افزارها
.با داشتن یک نسخه پشتیبان از داده ها، می توانیم آن را از زمان اولیه بازیابی کنیم
وجود یک کپی از اطلاعات در فضای خارجی برای جلوگیری از از دست رفتن اطلاعات بسیار حیاتی و ضروری است. این کپی اضافی می تواند، برای مثال، یک هارد دیسک خارجی یا یک حافظه USB یا یک سیستم ذخیره سازی دیسک یا فضای ذخیره سازی ابری باشد
دستگاه منبع (یک ایستگاه کاری)
دستگاه پشتیبان محلی شما (هارد درایو خارجی)
موقعیت مکانی خارج از سایت (راه حل پشتیبان گیری ابری)
:راه حل های پشتیبان گیری
پشتیبان گیری از فایل
از سرور
از دسکتاپ
روش های پشتیبان گیری
دو روش کلی برای پشتیبان گیری وجود دارد
:روش میدانی یا سنتی
داده ها به صورت سریال با استفاده از یک سرور یا نرم افزار پشتیبان تهیه می شوند. سرور پشتیبان داده ها را بازیابی می کند و ایندکس می کند، داده ها را برای بهینه سازی و جستجوی آسان قبل از ارسال، فشرده و رمزگذاری می کند
:روش مبتنی بر آرایه
این روش پشتیبان گیری مبتنی بر آرایه است. روش کار این روش بر اساس اسنپ شات است که جایگزینی برای محافظت از داده ها ارائه می دهد
:مزایای این روش عبارتند از
عملکرد بالا در خاطرات شخصی
فشار کم روی حافظه
سطح خدمات بالاتر برای ارائه نسخه های پشتیبان بیشتر
بهره وری و کارایی بالای داده های ذخیره شده
استفاده آسان تر و سریع تر از هم ترازی داده ها
اگر علاقه مند به دیدن یادگیری بیشتری درباره ذخیره و بازیابی هستید، می توانید اینجاکلیک کنید
گفته می شود که مشاوره فناوری اطلاعات از تخصص و فناوری برای ایجاد یک پیشرفت جامع در راستای تحول دیجیتال و بهینه سازی سیستم استفاده می کند
ماموریت آن چیست؟
در این راستا اهداف کسب و کار اولویت بندی می شوند، به عنوان مثال کاهش خطای انسانی، بهبود سیستم و افزایش کارایی در اولویت قرار می گیرند. ماموریت وی، خودکار سازی و دیجیتالی کردن عملیات، بهینه سازی نرم افزار و ارائه و پیاده سازی آخرین فناوری ها است
این خدمات به شما در بهبود معماری نرم افزار، بهینه سازی نرم افزار، ایجاد استراتژی دیجیتال و بهبود عملکرد سیستم کمک می کند
طراحی زیرساخت، برنامه ریزی، بودجه بندی نیازها از دیگر موارد قابل ارائه در این سرویس است
تفاوت آن با خدمات فناوری اطلاعات چیست؟
خدمات فناوری اطلاعات محصولات قابل تحویل هستند. به عنوان مثال، می تواند یک وب سایت یا خدماتی باشد که در نهایت منجر به ارائه محصول شود
اما خدمات مشاوره فناوری اطلاعات متفاوت است. مراحل زیر برای این کار است: ارزیابی، شناسایی نیازها، مشاوره برای بهترین راه حل. آنها اغلب توسط شرکت های خدمات فناوری اطلاعات استخدام می شوند
با خدمات مشاوره فناوری اطلاعات، رشد و موفقیت کسب و کار را در هر سطحی تسهیل کنید.
این سرویس تضمین می کند که مشاوره تخصصی دریافت می کنید و با پشتیبانی و مدیریت عالی به کار خود ادامه می دهید
یکی دیگر از آنها مشاوره برنامه ریزی معماری است
این خدمات شامل خدمات مشاوره، برنامه های استراتژیک و فناوری های نوظهور می باشد. در این سرویس، طراحی منطقی محیط شبکه و زیرساخت مهاجرت به فناوری های نوظهور، بررسی خواهد شد
مشاوره به توسعه یک نقشه راه روشن و استراتژیک با اولویت های اهداف تجاری کمک می کند
ارزیابی تجهیزات فناوری اطلاعات
تجزیه و تحلیل عملکرد شبکه و امنیت سایبری
بودجه مورد نیاز برای افزایش عملکرد سیستم را برآورد کنید
ارائه گزارش عملکرد و مشاوره
With Python Standard Library, we call module code that is ready to use. We cannot use these modules without recall and if we need, we must call them.
The Python standard library is very extensive and offers many features. In this library, we see internal modules that are often written in C language. For example, we can access the file input/output system through these modules, without these modules, Python programming will be inaccessible.
These modules provide increased programming capabilities. In the installed version of Python in Windows or Mac, usually the entire standard library also install and accessible and there is no need to add them, but in Unix, they are a set of packages that we can install separately.
Modules are the main unit of code in Python and there are two types of modules in Python:
Pure module: This module is written in Python and is in a .py file
Extension module: This module is written in these languages: C/C++ for Python, Java for Python.
we have many Modules in Python, for example Modules:
OS: operating system dependent functionality
Random: random number generators
Datetime: manipulating dates and times
Sys: information about system
Collection: data structure and datatypes providing
How we can recall a library in Python:
for recalling, we have two options:
Recall all module: In this way, we recall all module and when we want to use commande we write module. Submodule (X)
Recall a specific sub module: In this way, in command we write just submodule (X), and it doesn’t need to write module name before submodule
In this course of Linux commands, we will introduce four Linux Command – (apt-get)(Shutdown)(tree)(which-where):
apt-get
Shutdown
tree
which-where
(apt-get):
The apt-get update command updates the list of available packages (programs) that can be downloaded.
*If you type this command as a non-root user, the system will refuse to execute the command because the user does not have the necessary privileges.
• The shutdown command allows you to schedule device shutdowns and restarts, sends a warning message, and prevents other users from connecting.
• To use this command, you must have root rights: if you are not logged in as superuser, use Sudo.
To quickly turn off the computer
> Shutting down -h now
• To restart the computer immediately
> Shutdown -r now
• To shut down the system in 30 minutes and notify other users of the action
> shutdown -h -t 30 “Scheduled shut down for maintenance”
(tree):
Sometimes it is useful to have an overview of the tree structure of the file system to facilitate navigation between files. We can use the command tree. This command does not install by default. To install it:
> sudo apt-get install tree
> tree
To display only directories without the list of filenames:
In this course of Linux commands, we will introduce the command (which-where). We start tutorial by mentioning the structure and example.
In general, executable programs are in one of the following directories: /bin, /usr/bin, /sbin, /usr/sbin, /opt
To locate an application, we use command “which” or “where”
WHILE loop is especially useful in Python programming, and we use it many times. In the WHILE loop, we start a loop until the condition in the loop becomes True and the loop stops.
In this loop, while first evaluates the desired condition, if the condition is correct, the command inside the loop is executed. After that, the condition is reevaluated and this process continues until the desired condition is violated and when the condition becomes False, the loop will stop.
Syntax:
while condition:
statement
In WHILEloop, we need a condition to stoploop, if we don’t write a condition to stop, loop will continue without stop. here are some examples:
while a > X:
print(‘Y’) →a=a-1
while a >= X:
print(a) →a-=1
Example :
a=1
while a <= 5:
print (a)
a=a+1
Output:
1
2
3
4
5
Example :
a=1
while True:
print (a)
if a==5:
break
a=a+1
Output :
The output for this example is same as the last one, I just wanted to teach you the same result in two ways.
Infinite while Loop in Python:
In this model of the loop, if the condition is True, the loop will run for infinity. In Python, to prevent this model of infinite loops, a workaround has been considered that if the compiler detects that the loop is not able to stop, it stops automatically. To avoid such infinite loops, we need a condition in the loop to stop.
Loops are used for sequential traversal, that’s mean used for repeating variables such as numbers, strings, lists or sets. The loop continues until it is terminated by the variable or by terminating the loop with the Break command. In this section, we want to learn how to use loops. loop in programming languages is an iterative method and is also found in other object-oriented languages. With a loop, we can execute a set of commands, once for each item. Loops in every programming language start with a set of rules, but they may be slightly different in structure. Python also has statements and conditional loops.
In the first part, we will introduce the FOR-loop Python. With this loop, we can iterate through instructions based on the number considered in the loop. First, we examine its structure:
for<var> in<iterable>:
<statement(s)>
In this structure, the “statement” repeats i times
let’s to see some example
for i in “Hello”:
print(i)
The output of this command: in five lines it prints Hello, line 1 first character, line 2 second character and …
for i in “Hello”:
print(1)
The output of this command: in five lines it prints 1, line 1 print 1, line 2 print 1 and …
for i in “55”:
print(i)
The output of this command: in two lines it prints 55, line 1 print 5, line 2 print 5 and …
if we want to print for example from 1 to 50, we can use command range(): in this command we can make [start,stop,step]
for i inrange (3):
print(i)
The output of this command: in three lines it prints: line 1 print 0, line 2 print 1 and line 3 print 2
We must know range (3), prints 0,1,2. If we want to print 1,2,3 = for i inrange (1,3+1)
With [step] we can skip numbers, for example: this prints 1,3,5 = for i inrange (1,5+1,2):
The use of virtual machines is being used day by day. In companies, institutions and even at home for practice and learning. We can install virtual machines on personal computers that have minimal functionality. When we install these softwares on Windows 10 or 11, in some cases, problems arise to run it. One of them is, “Problems running Hyper-V & VirtualBox” at the same time. Here we are going to explain how to solve this problem.
If you installed Hyper-V and you want to install VirtualBox, you will have this issue:
mes you get error to run these two, together. In this tutorial we teach you how you can disable Hyper-V and use VirtualBox.
Here is the command to disable Hyper-V to solve this problem
bcdedit.exe /set hypervisor launch type off
After running this command, you must Restart the computer, and try after that.
In this part we want to know, what is Backup and Recovery?Backup refers to storing information in external memory to protect information from accidents and loss. Recoveryrefers to returning data from a saved copy to the original location or to an alternate location where information has been lost or damaged.
To store information, we use a separate system or media such as virtual hard drives, data storage servers or cloud storage space to protect them against the possibility of data damage.
Why do we need backups?
Why do we need backups?By making a backup copy, we make a copy of the information in a peripheral memory so that we can recover it in case of damage to the primary data.Primary data failures usually occur for the following reasons:
Hardware defect
Defect in the software
Corruption of information
Human error – accidental deletion of data
Attack of viruses or malware
by having a backup copy of the data, we can restore it from the initial point in time.
Having a copy of information in an external space is very vital and necessary to prevent information loss. This additional copy can be, for example, an external hard drive or a USB memory or a disk storage system or Cloud storage:
The source device (a workstation),
Your local backup device (External HDD),
Off-site location (Cloud backup solution).
Backup solutions:
File-only backup,
Server backup,
Desktop backup
Backup methods:
There are two general methods for backup:
1. Field or traditional method:
Data is serially backed up using a backup server or software. The backend server retrieves the data and indexes, compresses, and encrypts the data for optimization and easy search before sending it.
2. Array-based method:
This backup method is based on array. The way this method works is based on Snapshots, which provides an alternative for data protection.
The advantages of this method include:
High performance on personal memories
Low pressure on memory
Higher service level to provide more backup copies
Productivity and high efficiency of stored data
Easier and faster use of data alignment
If you are interested in seeing some learning you can click here.

 در این قسمت می توانیم لایسنس ها را با هم مقایسه کنیم و بهترین محصول مورد نیاز خود را بخریم. همانطور که میدانیم برای خرید حتما باید با کارت اعتباری خریداری شود، ما میتوانیم شما را در این راه راهنمایی نماییم
 :چند نمونه از نقش ها اینجا وجود دارد