It is a powerful hypervisor that we can install directly on a physical server. It has extremely high control over hardware resources and can effectively partition hardware to consolidate applications and reduce costs.
Hypervisors help a lot with better results in business management and information technology savings to achieve modern technology and optimal use of existing hardware resources. Due to the prohibitive cost of hardware resources, with the help of hypervisors, we can make the most of the available resources by dividing them and assigning them to several operating systems. With Hypervisors’ help, we can share existing hardware to use higher capacity, which increases performance, and we can also centralize IT management and simplify its control.
ESXi, formerly known as ESX, is a type 1 hypervisor developed by VMware and It use to provide the service of virtual operating systems. In fact, ESXi is not a program that we install on an operating system, but we can use it to integrate the critical components of operating systems, in other words, we can use several operation systems and install and run them at the same time.
As you know, hypervisors allow us to install an unlimited number of virtual machines (depending on the hardware) and one of the best of these is ESXI. In this tutorial, we are going to teach how to install ESXi on VMware.
What we can learn in this tutorial:
Our method is fast training so that maximum learning can be done in minimum time.
It is an intrusion method that hackers use to find open entrances or network weaknesses. Through this attack, they find open ports in the system and can send or receive information. They can make sure that firewalls are active or inactive by cyber-attack on ports scanning.
They send a packet to a port and in the message that they receive, they can determine whether the port is active or inactive and whether there is a weak point to enter the system or not. Network administrators inform about the vulnerability of the network system in companies and organizations by scanning the ports and take action to secure those ports.
we can use Applications like (Nmap) and Netcat check the security of the network. During port scanning, we can get information about running services, users, unknown intrusions and much more.
With port scanning we can find which ports are open on the network and they can receive or send data. We can also send a special packet to a certain port to identify the vulnerability of that port. Its purpose is to identify IP addresses, hosts, and ports.
After a full network scan, we can enable unauthorized access. IT managers use this process to investigate vulnerabilities and by cybercriminals for sabotage. The scan results can determine the network security levels.
All ports assigned by port numbers, and they range from zero through to 65,536 and ranked in terms of popularity. Ports numbered 0 to 1,023 are called “well-known”, these ports assigned by the IANA. IANA is an Internet Assigned Numbers Authority.
In this part, we try it with Kali Linux:
for this learning we have three virtual machines, and we test with them: Debian, CentOS, Windows
In this tutorial we want to install DNS on Windows Server, but before that, we ask What is DNS and Why do we use it?
What is DNS and Why do we use it?
The DNS system is a process for addressing a domain name to an IP address. Since it is difficult to remember the IP, we can use this process to consider a name for each address, and when we type the domain name, the IP address will call automatically.
Domain name servers or DNS contain a database that stores all public domains and their corresponding IP addresses. DNS translates domain names to IP addresses. For example, whenever you type google.com on your browser, your request first goes to the DNS servers and by the DNS servers, that name translate into an IP address and through it, it connects to the website server and in Finally, you can see the website in your browser.
Sometimes, when you send a request to the DNS, it may not be able to find the IP address of the desired website, in this case, the first level DNS sends a request to the root level and asks for the IP address, and if from that level No results receive too, the request will send for the top-level domain (TLD).
Usually, the first level of request will be sent to Internet Service Providers (ISP).
Why do we use it?
We use this process for all devices connected to the Internet and it is particularly important to work with the Internet. Usually, you don’t need to worry about this or do anything special, because the ISP automatically translates DNS server address by the ISP for you.
In this tutorial we want to try Firewall in CentOS but before that we ask: What is a firewall? Firewalls are the first line of defense in network security. They are a network security device that can be hardware or software and control incoming and outgoing traffic.
Firewall is a part of network security that controls and filters traffic. The firewall place between the Internet and the end user and filters the Internet based on the rules previously defined for it and whether it allows access or not.
In Linux, Netfilter use to allow access or deny access to network traffic. Filtering packages and their management is particularly useful and important for management in an organization.
If a package enters the server, we need Netfilter to check it so that we can check it according to the rules and allow access or not.
A firewall is a set of rules, and when a packet tries to pass through it, its contents are checked according to the rules of the firewall. A firewall is a tool for managing firewall rules on any Linux machine and it can also be described as a device that examines network traffic (outgoing/incoming connections) and makes traffic decisions.
Now we try to install it in CentOS:
In during this tutorial, we try to Start, Stop, Enable or Disable
First, we check status by command systemctl
If it was inactive in setting let to start it, after starting it, we can check again status.
there are four options to check firewalld that we can use:
[start/stop/disable/enable]
this command is for checking status:
$systemctl status firewalld.service
firewalldis a dynamic firewall that provides support at the trust level of connections or network interfaces and supports IPv4, IPv6 protocols.
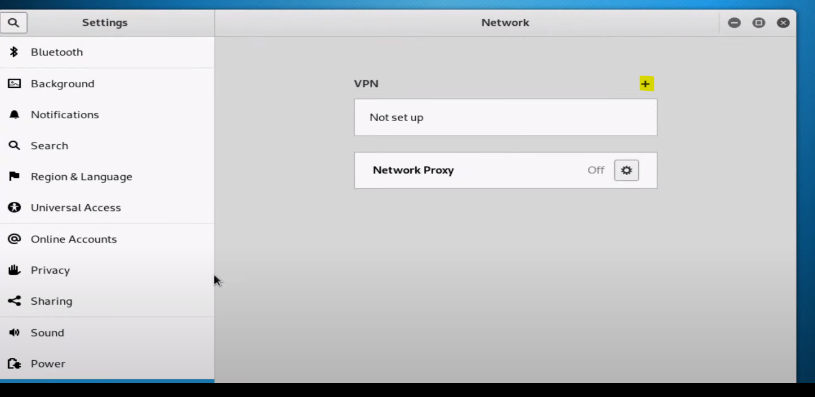
Sometimes when we install Kali Linux, we have Interface problem and we don’t have any interface in the network settings at first, in this tutorial we will teach you, how we can add an interface and make the corresponding settings.
We check some setting in Kali Linux:
First, we can check settings and if we can add interface, we do it by graphic mode. If the option to add was off and we cannot add it, then we try by command.
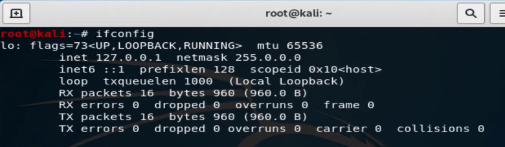
To check setting by command we type ifconfig. If any interface was on, you can have in result
note: Inet 127.0.0.1 netmask 255.0.0.0 is not active interface
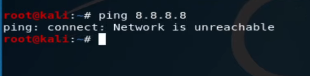
You cannot see any interface and IP; we go next steps. also, we can check it with ping 8.8.8.8
Command DHClient:
The DHCP protocol requests an available IP address from a server or IP provider, which may be assigned in one or more subnets. A DHCP client may request an address from this pool and then use it temporarily on the network. Also, when requesting an IP address, a client can get more details about the connected network, such as the range IP, Gateway, name server, etc.
When running the dhclient command, the dhclient.conf file is called for configuration. It then gets a complete list of network settings configured on the current system and attempts to configure the interface using the DHCP protocol.
The DHCP Client or dhclient command is a tool for configuring a network interface using the Dynamic Host Configuration Protocol
with command #man dhclientyou can get more information about this command in Linux: